


Cmslooks has a plugin system to extend the CMS functionality with more awesome features. And you can build your plugin and use it in the project. And also you can sell the plugin personally or through the marketplace.
Plugin Directory Structure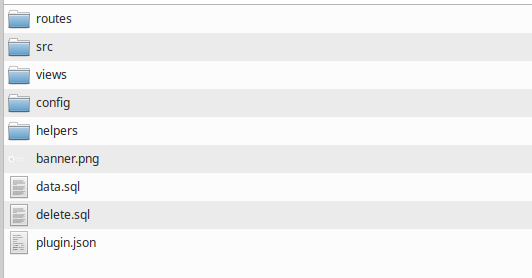
Plugin Development Guide:
1. Name of the Plugin
-- Create a folder of your desired plugin name. The root folder name must be the same as the plugin name.
2. Plugin Configuration
- All plugins are registered to the composer autoloader manually. A theme must need a plugin.json file to provide all the needed information for autoloading.
Example:
{"name": "Demo Plugin","location": "demo-plugin","namespace": "Plugin\\DemoPlugin\\","version": "1.0","author": "Themelooks","url": "http://www.themelooks.com/","description": "Plugin short description","license" : false,"license_api": ""}
3. Setup Plugin Banner
-You need to have a banner.png file to showcase the plugin image. preferred size 294 x 95 px.
Directory Structure

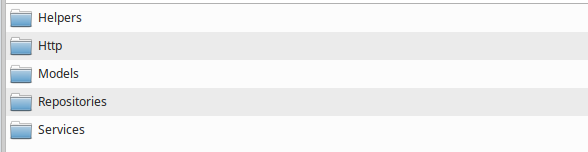
2. src.
- Here are all the src files Like Http/Controller, Http/Request, Models, Repositories, Services, or Any Class File that should be situated. And remember all class files should have the Plugin Namespace to work.
3. views
- All the Plugin view files should be here. You can get the view file like this - "plugin/your_plugin_location::rest_of_the_file_path".
Example - "plugin/demo-plugin::home" OR "plugin/demo-plugin::page.index".
- Also if you want to show the plugin link in the sidebar you have to create a includes folder in views. And a navbar.blade.php in the includes folder. In the navbar file, you can write the nav item.
4. config (Optional)
-If you want to have a config file for your plugin-related data, you can create a config folder. And a config.php file. And to access the config file data - "config('plugin_location.data')".
Example - config('demo-plugin.status.active') .This config folder is optional and not required to build a plugin.

5. helpers (Optional)
-If you need a helper function for your plugin, you can create the helpers directory and a helper.php file in the folder. All the functions in that folder will be autoloaded. You can follow the Core/helpers/helper file on how to write functions on this plugin helper. But this is also optional and not required for the plugin.
Manage Plugin Database:
1. data.sql (Optional)
- data.sql is a SQL file. This will be executed when installing the plugin. If your plugin needs a new table you can write the SQL in the data.sql file. But be cautious, about the SQL, and avoid deleting or modifying other tables. This file is also optional and use only when required.
We have a Plugin helper function in Core/Helpers. You can use those functions to develop your plugin and avoid getting errors.
When you ready your Plugin then you can install the plugin from the plugin manager.